How to Clean a Customer Mailing List in Microsoft Office 2011 for Mac (De-dupe and Address Validation)
You would think I stopped advertising through direct mail in this age of fancy social media but direct mail still works. Here are my top tips on pulling a mailing list of your customers and then getting it ready for a mailing house using Microsoft Office.
Which Customers Should I Send To?
Obviously this is going to depend on the goals of your specific campaign but I like to consider the following:
- Geographic location: For most mailings, I limit my list to customers within 5 miles of my store. There is no use in sending a promotion to tourists who only visited your store once on vacation.
- Total revenue: Everyone has high and low value customers, perhaps try converting medium spenders to high spenders in your next campaign?
- Frequency of purchase: You may find that more frequent shoppers are more likely to respond to your mailing over single visitation high-spenders.
- Timing of purchases: If you're planning a holiday promotion, you might try contacting the customers who shopped with you during that last holiday season.
#1 Hide Irrelevant Data
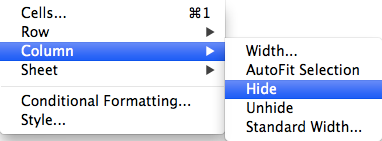
 Depending on how your list is pulled, you may have columns of information that you won't be using to make your mailing list decisions (customer numbers, phone numbers, etc.) Select those columns and Option-Click to hide them or go to Format > Columns > Hide.
#2 Freeze Your Header Row
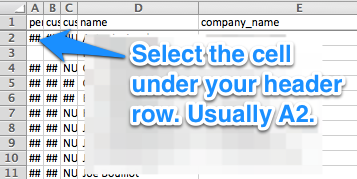
 If your list is more than a screen length long, it'll be easier to read if you freeze your header column with labels. This will allow you to see those labels no matter how far you scroll down. Select the cell under your row of labels and go to Window > Freeze Panes.
#3 Turn on Filters
 Your mailing list likely has some entries with incomplete information (blank name, address, city, etc.) You're going to check for blank cells by filtering your data and sorting it. First select ALL of your data (if you leave any columns out, they will be mismatched with the rest of your data FOR ALL OF TIME.) Then go to the Data > Filter. Now you have nifty little inverted triangles at the top of each row.
#4 Filter for Incomplete Data
Go to your first nifty inverted triangle in your first column (typically name) and sort the list by ascending or descending. Then scroll to the bottom of your data and you'll see all the rows that are missing data. If you have the business name but not an individual in that business, your direct mail piece will likely end up in the trash. Mail rooms just don't know what to do with general mail that isn't addressed to a specific employee or department. Do this with all of your columns, delete rows with incomplete data until you've eliminated all the bad addresses.
#5 Find & Replace Bad Data
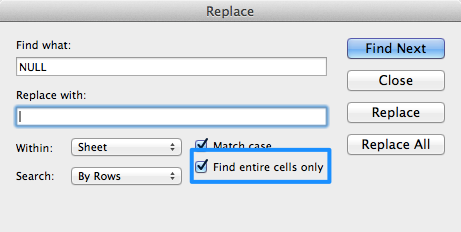
 Your data may have unhelpful cells filled with "NULL" or all your ampersands (&) were replaced by "•". Scroll through your data and see if there are any repeatable errors you need to find and replace. If you have complete cells of unhelpful data:
- Select the column with the replaceable data
- Hit Command-F
- Put the bad text in the "Find what:" box
- Click Replace and leave that box blank
- Then select "Find entire cells only" (if you don't you'll also erase anyone that happens to have "null" as part of their name or address)
- Hit Replace a few times to make sure it's working correctly
- Then hit Replace All to finish the job.
If you have strange text that has replaced normal characters you can put the bad text in the "Find what:" box and what it should have been in the "Replace with:" box and repeat the same steps (keeping "Find entire cells only" turned off).
#6 Duplicate Your List Before De-duping
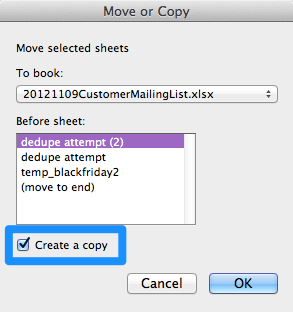
 It's a good idea to duplicate the list you're working before you do any major (or experimental) deletion. Go the bottom tab of the sheet you're working on and Option-click it to bring up the Move or Copy menu. Select your sheet and Create a copy to duplicate your list.
#7 Eliminate Exact Duplicates Automatically
Depending on how your list was pulled you may have duplicate customers on the list (and you don't want to spend the money sending them the same piece twice.) This will only work if the data you have is an exact duplicate. For example, if you have one row where the customer has put their apartment number and one row where they haven't, you'll have to wait until the next step to catch that.
- Select ALL of your data (if you forget any columns your data will be mismatched FOREVER and your mailing list will be ruined.)
- In your ribbon (the big menu at the top) go to Data and then Remove Duplicates.
- Select the columns that are most likely to have duplicate information. I like to select the columns with name and ZIP code. If the name and ZIP code match I have enough data to assume the customer is the same and therefore one entry should be eliminated.
- Select Remove Duplicates.
#8 Eliminate Partial Duplicates Manually
Your final check for duplicates uses conditional formatting to highlight possible duplicates for you, so you can scan down your list quickly.
- Go to the Home ribbon.
- Then select Conditional Formatting > Highlight Cells Rules > Duplicate Values...
- I prefer to select Format with: red border but you can use whatever you like before pressing Ok.
#9 Make the Final Cut
Before you spend mucho time scrolling down through your list manually to remove duplicates, you may want to narrow down your list even more. Think about cutting customers that are far away, don't spend enough, or you don't have recent addresses on.
#10 Do The Last Manual Check
Scroll down your mailing list and do a final check for issues like:
- If you have two entries for the same name, eliminate the entry with less address information.
- Delete customer nicknames or extra information that may be in your data.
- Anything else your database might have institutionally wrong with the mailing information.
#11 Create Your Control Group
To measure the effectiveness of your mailing, sort out at least 10% of the list and mark that as a control group. This will be a group of customers that fit the same buying patterns as the customers you mailed but did not receive the promotion. This will help you assess of the customers that you did mail how much buying would have happened without the promotion. You CAN'T just chop off the bottom of the list though, this must be a random sampling.
- Insert a new column at the front of the sheet by selecting the top cell left cell (like A1), then Insert>Cells and then Entire Column.
- Select the the second cell in the new column (like A2) and enter "=RAND()" in the cell to insert a random number.
- Select the second cell in the new column (like A2) again. Then hold Shift, scroll to the bottom of your list and click the last cell with data in that column (like A19292) to select the entire column.
- With the entire random number column selected, go to Edit > Fill > Down to insert the "=RAND()" formula into every cell.
- Now that you have random numbers, use your automatic filters (upside down triangle at the top of each column) to sort the mailing list by ascending or descending random numbers.

